Sunday, December 30, 2012

Gold Glitter Votives

 
Looking for a fun and easy way to decorate the votives for your tabletops for your reception? Visit 100 Layer Cake for the tutorial on these beauties! Some gold glitter, modpodge, clear votives and you're good to go! Designs can be random or just the top edges or the bottom half of your votives, or just mix and match them. What a great look for a little bit of money.
 
While you are checking out their tutorial for these votives you are sure to want to spend some more time (more like hours) going through the rest of this great creative site. Enjoy!


Saturday, December 22, 2012

DIY Floating Canopy For Your Wedding

Photo and directions from Home Interior Ideas
 
Looking for a unique way to mark your wedding location in your local park or back yard? Why not try this canopy that floats courtesy of multiple balloons. How do you do it? The balloons are attached to the grounds using fishing line, invisible but strong. How cool is this? I think this is one of my favorite do it yourself outdoor wedding ideas.
 
Arrange your ceremony under one end, your reception at the other, or use one half the canopy for your ceremony and chairs for your guests to relax on, and the other half for the reception. No matter how you decide to arrange the details the overall look is striking.


Monday, December 10, 2012

Sealed With A Kiss? Nope, A Label.

Mail details courtesy of I Still Love You
 
Do you love those little details but don't have the time or skill to add them yourself? Or you lack the calligraphy skills to do these by hand? Melissa Esplin from I Still Love You has figured out a quick and easy way to use your printer and Avery Labels to let you give your invitations a classic look. Not only that she provides you with a free download on her site. So head over there now and see just how simple this is.
 
I tested this on my husband Bill (of (EEEBCDI) Easy Enough Even Bill Can Do It fame.) For new readers, my husband tests my DIY projects to see just how easy they are to do. He's not at all crafty and not graphically inclined. It's a good thing I only had a couple of sheets of clear labels left or he would still be in there printing these! He loves an easy project. So if he can do it, you can too, or your fiance can. No more waffling out of pre-wedding projects by saying 'it's too hard.' This one is EEEBCDI, so if Bill can do it he can do it too!


Ribbon Cupcakes You Can Make Yourself

 
Looking for an easy cupcake to make for weddings or wedding showers? Try these easy cupcakes decorated with colored bows. Simple to make, but so attractive your guests will rave. No matter what color your wedding theme is, you can make these Wilton Sugar Sheets and a rotary cutter, also by Wilton.
 
 
Sugar Sheets also come in a variety of decorative patterns that may be perfect for your occasion. Make everything look special using Wilton tools and supplies.
 
Looking for some guidance using these products? Check your local craft store or kitchen supply store that sells Wilton products.
 

Sunday, December 2, 2012

Spell Out Your Love With DIY Love Blocks

 
If you are planning a romantic centerpiece, Six Sisters Stuff has a great tutorial on how to make these 'Love Blocks.' Depending on how you size them you can use them at each place setting or as part of a centerpiece. Combine with some votives in similar colors and you're ready to rock!
 
I love the variety of black and white backgrounds with the bright red accents, use them for a Valentine's Day wedding or any wedding that black, red and white accents will coordinate with. No doing those colors? Just change out the colors to some that work with  your wedding theme colors.
 

Wednesday, November 7, 2012

Salted Caramel Sauce To Die For!

 
Always with Butter, a blog to die for (at least if you aren't on Weight Watchers!) has this lovely recipe for this soft and luscious salted caramel sauce that is perfect for a wedding favor in the fall. It's soft and gooey and oh so so good. Even if you aren't having a wedding or shower that you need a favor for, you REALLY want to make this sauce. (My husband couldn't keep away from it while I was making it!) It smells and tastes great and looks really good too--what more could you want? Well calorie or fat free would be good but the taste would be ruined so... just enjoy and work it off the next day. Your guests will love it and so will you! 
 
To find the recipe head over to Always With Butter. You'll enjoy this recipe and want to try more of their other recipes as well. Enjoy your salty caramel sauce--and share (I know, it will be hard..but...)

Saturday, November 3, 2012

A Smart Bride's Way To DIY

 
Have you considered making centerpieces out of glass for your wedding day? The Butterfly Cloche above from Country Living Magazine would make a great highlight for a wedding featuring butterflies or nature themes. For the tutorial (and other great craft ideas) go to Country Living Magazine.
 
 
No bride wants to get so bogged down in a diy project that her wedding planning starts to become work. For a bride planning a DIY wedding, choosing extremely difficult or time consuming projects takes away the fun factor!
 
If you are looking for a less formal look, try these mini domes. They are made using glasses (turned upside down of course) with tiny keepsakes inside. Personalize your guests' wedding tables with 'a few of your favorite things.' To find the tutorial go to Country Living Magazine online. I love the personal look these give you. You don't have to use them for all the tables, but they would be cute added to your guest book table or other side table.
 
The best part of these DIY projects? They are rated EEEBCDI (easy enough even Bill can do it).  For those of you just starting to read my blog you may not realize I am not crafty, but my husband is worse. I mean he's great at some things, fixing things, putting things together, but not tiny little projects like this. So I test out the ease of the tutorial by having him try them out. If it's rated EEEBCDI, your groom should have no problem either, which makes these projects all the more fun. Or if you are all thumbs, they will be easy enough you can do them without the stress no bride to be needs during her wedding planning! Have fun, that's the whole point of this!


Friday, November 2, 2012

Grandma's Mustache In Wedding Photos

 
Do you love this idea? Originally from Paper + Craft, a great book available on Amazon or from your local independent bookseller, it was published online on Etsy's link (see below the photo).
 
Can't you just see the great photos of you and your groom? Not to mention your guests and grandmothers! Add lots of fun to your wedding without adding a lot of cost. You can make these yourself and just add them to your drinks! This one is perfect for pink lemonade! Get some great color straws and get to work! Click the Etsy link to get the tutorial.
 
Go and pick up your copy of Paper + Craft by Paper+cup Designs, Minhee Cho at your local independent bookseller or order from Amazon. Your independent may not have it in stock but they can order it for you and you'll be supporting your local economy.

Monday, October 22, 2012

Let It Snow - DIY Winter Wedding Centerpieces

 
Tracie at Cleverly Inspired made these wintery centerpieces from three empty wine bottles. She added some holiday ornaments (also with some 'snow' added) and some votive candles, and placed them all on a tray. Voila! A perfect centerpiece for a wintery wedding!
 
You won't believe what you use to make this--some craft bond spray adhesive (try your local craft store) and Epsom Salts. (If you don't have a box at home already, check near the first aid aisle in your pharmacy.  No fancy fake snow flakes...just epsom salts! Tracie is so clever! Of course you'll need some help drinking all the wine so you have enough wine bottles, so sounds to me like it's time for a PARTY!
 
Be sure to take the time to visit Tracie's blog to get the whole tutorial, not to mention see all the other great ideas she has that are quick and easy.

Saturday, October 20, 2012

Peacock Wreaths For Your Wedding

 
I admit, I tried this first without finding a tutorial--big mistake! Because what I didn't realize was you needed a base of green chandelle or turkey feather boas, once I figured that out the rest was so easy you may not even need the link for the tutorial that I posted under the photo of my wreath. Granted, they hung their wreath using a purple satin ribbon, but since I was making mine to add to my 'collection' of peacock feather decorations for weddings, I left the ribbon off.
 
Two critical tips for my success: First: be sure to let the paint dry before you try to attach anything, rushing it will not work. Second be sure to use spray glue, it's so much easier with feathers than hot glue or other craft glues.
 
This is time consuming the first time but if you are making several, by the time you get to the last one you'll be cranking them out pretty quickly. I tossed the first two I tried (one, I didn't let the paint dry, the second, I tried to used hot glue and made a huge mess!) But after that it was pretty easy.
 
Be sure to work where you have plenty of ventilation (I ended up using my front yard.) My neighbors were intrigued. But now my grass has some paint on it (one good reason to work outside, it's not on my floors. Just do it on a calm day and stay away from your cars.) Good luck, have fun and enjoy your wedding day.

Friday, October 19, 2012

Candymaking for Wedding Favors

 
Want to give a wedding favor that has the personal touch? Brit + Co. shows you how to make your own candy combining candy you can easily find at your favorite store and combining them so you have a decorative product when you are finished.
 
What do you need?
 
Materials:
- candy bars (above photo used a combination of Snickers, Twix, Milky Way, 3 Musketeers, Reese's Peanut Butter Cups, and Hershey's Cookies n' Creme Bar)
- Starburst
- Airheads
- a sharp knife
- rolling pin (even better if you have a mini one!)
- aspic mini cookie cutters (I got mine on Amazon, but you can pick them up in your local brick and mortar stores as well to save on shipping.)
- clear gift bags
- string or ribbon (I prefer ribbon, the kind that curls)
 
Cut your candy bars into bite size pieces (no snacking, I saw that!). Next you need to roll out your Starburst and Airheads. They need to roll flat enough that you can use the mini cookie cutters to cut our decorations with them.  Cut out your favorite designs (I like the hearts. What can I say, I'm a romantic!)
 
 
Place the finished products in clear plastic bags, decorate with a tag, and tie with string or ribbons. Ta Da!


Wednesday, October 17, 2012

DIY Favor Boxes

Favor Boxes photo courtesy of Wedding Friends
 
Looking for an easy DIY project for your wedding? These favor boxes, courtesy of Wedding Friends, are easy to put together and fill with your favorite candy or other goodies. Wedding Friends gives you a printable that you can print yourself or take to your local print shop. Choose a heavier weight paper than your usual printer paper because you need it to hold up better. The link for this printable is at Wedding Friends as a PDF document.
 
While you are there don't forget to check out all their other great wedding ideas.
 

Tuesday, October 16, 2012

Pastel Folding Chairs

 
There's nothing I like better than a DIY project that is easy, fun, and looks great with minimal work--just my style! Do you have some old, ho hum brown or gray folding chairs? Or chairs that have nicks and scrapes accumulated over the years that need to be repainted? Kelly, the genius at The Moon and Me shows you how to spray paint your folding chairs and make them part of your decor.
 
Having a pretty pastel garden wedding? The chairs shown above would be perfect! Kelly recommends Krylon, but you can read her review of the other paints she tried and see what you think. She suggests 2 cans per chair. So what do you think?
 
I think this is an easy way to take a wedding from ho hum to WOW! And it's so easy even my non-crafty husband can do it. It definitely rates a EEEBCI rating (Easy Enough Even Bill Can Do It). It's a great project for grooms to do while you're busy doing something else! Start early and you can pick up inexpensive chairs at yard sales or Goodwill.

Sunday, October 14, 2012

Easy 2 Ingredient Strawberry Fudge

 
Looking for an easy to make fudge to use as a wedding favor for your wedding? Cookies and Cups has more than one fudge recipe but this one is super easy (only 2 ingredients), and it turns out pretty AND delish.
 
Not looking for pink? Or strawberry flavored fudge? Or watermelon fudge? Or key lime fudge? Trust me, Shelly has more! Just type in the word fudge in her search option and you're off!
 
Take your time browsing through Shelly's blog and you are sure to find a long list of fun and easy recipes for to take along when you're a guest or just to enjoy for a special occasion at home.
 
I can see taking some watermelon fudge along for 4th of July (when your sister has drawn the job of  hosting the family barbecue and insists she doesn't need a thing, but you just have to take something!) The watermelon fudge is perfect for that summer party when you just can't envision a party without watermelon!
 
Head to Shelly's blog, Cookies and Cups to find the secret ingredients for the 2 Ingredient Strawberry Fudge, then enjoy!  You may not even need to head to the grocery store for the ingredients--how easy is that? And you are sure to be hooked on some of her other easy recipes, perfect for busy moms who want to involve their children in cooking!


Saturday, October 13, 2012

Tutorial on Making Your Own Wedding Cake

 
Are you that brave bride (or mother of the bride) who is taking the huge step to make your own wedding cake? If so you want to head to Epicurious' tutorial. They have step by step directions plus a recipe for a Lemon-Raspberry Wedding Cake and a video to help you through every step from start to finish. With wedding cakes costing at least $400 (and that's a low estimate) making your own cake can save quite a significant amount of cash. (In my case it wasn't I was too chicken to make the cake, it was transporting it that made me hire someone!) I could just see all the layers smashed on the floor of my Tracker! NOT! At least not for my daughter's wedding. I don't want to try something for the first time when it's an important occasion and one where I'll be busy running around as it is. But if you are a gutsy bride, give it a try. Epicurious gives you all the info you need to pull it off.
 

Sunday, October 7, 2012

Easy Fondant Roses


Make these gorgeous roses from fondant/gumpaste to decorate the tops of  your cupcakes (or cakes). These are remarkably easy, just need a little patience and the right materials. Watch the tutorial, and give it a try.

I suggest reading the comments, it might make your project go a little more smoothly and/or just make it go faster.  Some info I found useful: be sure you don't place these in the sun to dry, the color will bleach out, also do not put the flowers in the refrigerator. Place the flowers on the cupcakes right before placing on display on your dessert table. You can use an egg carton in place of the plastic watercolor palette, not sure if the cardboard would absorb the dampness faster or not, just a thought.

***Most important: THAT IS NOT NAIL POLISH or EGGS used at the end to stick the white 'pearls' in the center. Obviously (or at least I thought obviously, but some people missed it) raw egg is not something you want to serve guests (can you say salmonella?) and neither is nail polish. (Shaking my head is wonder that anyone would think to use nail polish on something they were eating!)

I recommend doing a trial run or two before a special occasion so you have it down to a science!  How hard are these to make? They definitely are not EEEBCDI (Easy Enough Even Bill Can Do It), (anyone who reads my blog knows that my husband Bill tests out my craft ideas so I know which ones a total novice can handle.) This one requires more patience than he has for anything craft/or food prep related. So be prepared to put a little more work into it.

Enjoy the YouTube video by Cakes By Merry. And look for other tutorials by the same author on YouTube.

Friday, October 5, 2012

The Extra Touch For Your Stationary

Photo and tutorial on Inspired Goodness' blog (link below)
 
 
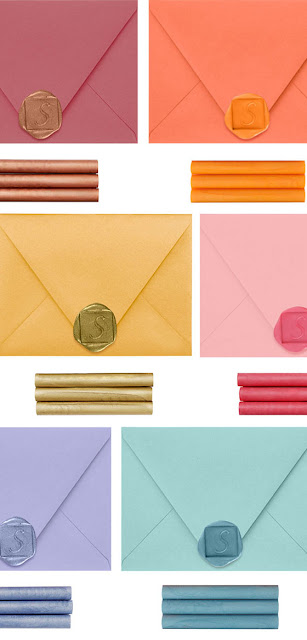
Want perfect seals for your wedding invitations or notes? See how to make this on Inspired Goodness' blog. 
 
What do you need? Just a glue gun, glue gun wax, wet paper towel and aluminum foil!
 
Glue Gun Wax is very easy to work with, is available in a large assortment of colors and can be used with any standard glue gun. They suggest that the round seals are easier to use, but it's your call. Be sure to read their whole tutorial for those important 'secret' details.
 
I love the look of the seals on wedding invitations and thank you notes don't you? And since it's easy, it adds a nice touch without a lot of extra work.

DIY Mirror Backdrop

(Photographer Tess Wilson for Apt. Therapy)
 
What a perfect background for a DIY Photo Wall for your wedding. Just pose the bride and groom goofing around in front of the backdrop, or their guests in glittery disco-esque looks for a fun DIY photo wall. Kind of an open photo booth! To see how to hang up your mirror garland (you can purchase it here) at Party Oasis. Then all you need are a few hooks, an aluminum rod, and some lights.
 
Need exact directions? Head to Apartment Therapy for their tutorial and see just how easily you can pull off this look for your wedding (or other party.)  They also have lots of other great ideas for your first home together. So head on over and settle in for a nice long reading session!

DIY Organic Table Numbers and Placecards

 
How simple and inexpensive can this DIY project be? Austin Wedding Blog uses an assortment of colors of cherries, go red, or golden, make small 'flags' to put around the stems and use your computer to type names on them in a cursive font before you cut them out and glue them around the stems of the cherries. Do the same to put the 'table number' on each cherry.  Put the number of cherries on the saucer of the people sitting at the table plus one.
 
Choose a pretty saucer for a romantic garden party look. Either pick up saucers from friends and family or hit Goodwill or the your local garage sales. Inexpensive but pretty! (Not to mention edible!)
 
Be sure to take some time to browse through this blog, it's full of great ideas that aren't too hard to execute.

Sunday, September 30, 2012

Rose Petals and Tabletops - Easy DIY Project

 
Scattering rose petals on a tabletop adds 'something extra' to your tablescape, but here's a great way to do use rose petals that will pull everyone's attention to your decor. Grab your hot glue gun and your silk rose petals and glue them to the table runner or organza overlay! Simple. (Though not necessarily fast).  Be sure to leave ample time for them to dry and don't use too much glue or the material will be glued to whatever is underneath it. You can also make bows for the back of the chairs for the bride and groom that are covered with rose petals. Just don't overdo it. If you think doing this on every table is too much, consider using it for your cake table.
 
Every wedding is memorable for different reasons. Some for the entertainment, some for the great venue, some for the inventive food--but every event should have some memorable very special decorations. If you use this rose petal runner you don't need expensive centerpieces, a simple silver vase with a small floral arrangement or some silver candlesticks will finish off the look. 
 
Don't forget to use rental products when you can instead of purchasing everything. The runner or overlays you will need to purchase because you'll be adding the rose petals to them--which means you get to keep them! (Not sure what you'll do with them later, although one would be great for Valentine's Day celebrations.)