Wednesday, September 26, 2012

Mini Sweets You Can Make Yourself

 
Love cupcakes? Love ice cream cones? Here's a combo in these mini cones of cake and icing and those so cute mini cones. They have added edible glitter to the cones to top them off and take them from ordinary to extraordinary.
 
The cones can be ordered from Home Chef Marketplace so all you have to do is add the cake batter, bake and top with butter cream and sprinkles. (Oh, and be sure to find a rack to hold them up!) And if you head over to Martha's web site you'll find the link for the cake recipe. How easy can she make it? Everything available.
 
As a mom I've made cupcake cones for my kids at school, but never quite this fancy. Enjoy!

An Apple A Day?

 
Looking for a fun thing to serve for the kids at your wedding reception? OK, so you know they'll eat chicken fingers, but this apple treat is perfect for snacking for them, either as an appetizer or a dessert. El hada de papel gives you the simple tutorial on how to make these.
 
When I first saw it I thought it was a heart painted on the apple, may be with a red icing paint. But when I looked at it more closely I realized it was made from two apples, one red, one green.
 
They used a simple cookie cutter in the shape of a heart to cut out a red heart shape and insert it into the green apple. Wow! Cute and fun. Frankly I know some adults who wouldn't be averse to these pretty apples. Great fun for weddings or even for moms or school teachers. I love it when something has multiple uses!

Saturday, September 15, 2012

DIY Thrift Store Vases


Thrift shops and garage sales are a great resource for decorating at your wedding reception. Why spend a fortune on vases when you can pick up some inexpensive vases at a thrift store or garage sale, add a little paint, and voila! You have a centerpiece that is pretty and will coordinate with your wedding colors.
 
Don't forget, mint and coral are big colors this year, so even if your bridesmaids are wearing a neutral color, use vases is these au courant colors and it will give you a nice pop of color without forcing them to own a dress that shouts "BRIDESMAID!" Believe me, they will thank you!
 
Be sure to spend some time reading Little Gray Fox and Little Foto Fox for more great ideas for DIY projects and more.


Friday, September 14, 2012

The Perfect Mini Appetizers You Can Make Yourself

Photo (cover of book by Peter Callahan)
 
I know, I've posted these cute spaghetti and meatball appetizers before, but at the time I didn't have a recipe for them. As promised, here is the source!
 
As I was watching television this morning, I came across Kathy Lee and Hoda and these great mini appetizers--and Peter Callahan's book, Bite by Bite. Of course I only saw it at the very end, so I had to scramble to find out the book's name! Here it is.
 
I'm sure this book is available online but I'm sure it is also available at your local independent bookseller as well. If not, have them order it for you.
 
(Putting in a plug here for your friendly local independents, support them.  They work hard to provide your community with a gathering place that encourages you and your children to read!) I always like to support my local businesses. Check and see what the closest independent bookseller is to where you live.
 
If you live in  the Collegeville area, visit Towne Book Center and order one from them if they don't have it in stock. Ask for our favorite bookseller, Pam Brown Margolis, although if she isn't there any of her great associates can help you out.
 
Can't wait to try these appetizers out on a crowd. Not sure if I'm going to wait for Thanksgiving or just plan a party before then.
 
I loved the checkerboard that the meatballs on the cover are served on. This is a perfect DIY project that will make your appetizers look even better! Food isn't just about the taste, it's visual too. (And there are no calories in the visual part of eating!)

DIY Mason Jars Go For The Gold

 
Gold mason jars? Sure why not? If you've been following the DIY Wedding world, you know that everything and anything is being done with mason jars.
 
This time mason jars 'go for the gold' as brides turn them metallic using spray paint. Some brides are using them for vases--an easy way to add glitz without renting some fancy stuff from the rental companies or using your family heirlooms.
 
 
Photo from Style Me Pretty/Photographer Pictilio
 
Mason jars gone gold let brides take their DIY centerpieces up a notch while still retaining that 'down home' feel. Go gold, go silver, go bronze, or mix the three. Whatever works for you.
Photo and tutorial from Lovely Little Details
 
 
I've seen photos on Pinterest of these metallic mason jars being used to drink from. I love the look, just not sure if I'd want to chance it.  But for decorative vases they rock! It's up to you if you want to take the chance on drinking from them.


Monday, September 10, 2012

Plan A Weekend of Beauty with DIY Products

Photo pinned on Pinterest from this link
 
 
Your bridesmaids have helped you do everything from choosing your dress to helping with DIY favors and decorating for your wedding, now it's time to pamper them a little. Can't afford a full day at the spa for them all? Not to worry, I have your answer! I admit, I found the answer on Pinterest... where you can find ANYTHING!
 
After I found this strawberry peppermint foot scrub on Pinterest, I tracked it down to Erika Katz's book and web site--wow! pretty isn't it? And the best part? Not only does it look and smell good, it works!
 
Why not make some as a pre-wedding gift for your bridesmaids--just a kind of tiny thank you for all their help. Either that or get together for a 'girls only' weekend. In the middle of all the pre-wedding insanity a day of pampering will make you all feel better. And you know what they say, if your feet feel good, you feel good!
Erika Katz, the author of Bonding Over Beauty,(and a web site of the same name) has some great recipes on her web site that you can have fun making and using as a group for a girls weekend of beauty. You can also find face masks, body scrubs and a variety of other DIY recipes on the Bonding Over Beauty site.
Keep in mind that these won't last forever, so make them and use them up, the DIY beauty recipes will tell you how long they will last.
 
Here's Erika's recipe for Strawberry Peppermint Foot Scrub
 
Strawberry Peppermint Foot Scrub
 
Ingredients:
 
§ 2 cups pureed strawberries
§ 1 tablespoon of olive oil
§ 1 tablespoon of vegetable oil
§ 2 tablespoons of granulated white sugar
§ 4 drops peppermint essential oil
 
To Make:
 
Mix all the ingredients well and put into a pretty jar. It’s great to use strawberries in this recipe because they are rich in salicylic acid which helps dead skin shed more easily. The sugar granules also help to exfoliate skin but are super gentle on delicate skin. You can also keep this recipe in the fridge for up to one week.
To use your scrub, simply rub your feet gently in a circular motion, rinse with warm water, and enjoy the results!


Sunday, September 9, 2012

Pickled Asparagus For Picnic Weddings

 
Having a picnic wedding? Or an outdoor garden wedding? Need some tasty treats to serve as appetizers?
 
Why not make some pickled asparagus? These delish veggies offer the tang of pickles but with a twist. Plus they are a little bit more 'gourmet' than your garden variety pickles. Consider wrapping them in prosciutto--yum!
 
The recipe is also courtesy of Chef's Forum which is a great place to visit and click through all their other great food ideas.
 
Ingredients:

30 asparagus spears
1/3 cup coarse salt
2 quarts cold water
1 2/3 cups distilled white vinegar
2/3 cup sugar
1 teaspoon coarse salt
1 teaspoon mustard seed
1 1/2 teaspoons dill seed
1 white onion, sliced into rings
1/2 teaspoon chili pepper flakes
2 sprigs fresh dill

Directions:


Trim the cut end of the asparagus spears, and cut into 3 inch lengths. Place in a large bowl with 1/3 cup salt, and cover with water. Let stand for 2 hours. Drain & rinse under cool water, pat dry.

Sterilize two pint size wide mouth jars in simmering water for 5 minutes.

In a saucepan over medium heat, combine the vinegar, sugar, 1 teaspoon of salt, mustard seed, dill seed and onion rings. Bring to a boil, and boil for one minute.

Pack the asparagus spears, tips up, in the hot jars leaving 1/2 of space from the rim.
 
Tuck one dill sprig into each jar, and sprinkle in 1/4 teaspoon of red pepper flakes.
 
Pour hot pickling liquid into the jars, filling to within 1/4 inch of the rim. Wipe rims with a clean damp cloth, and seal with lids.
 
Process in a boiling water bath for 10 minutes.

Cool to room temperature. Check seals when cool by pressing the center of the lid. It should not move.
 
Label and date; store in a cool dark place. If any jars have not sealed properly, refrigerate and eat within two weeks.
 

Saturday, September 8, 2012

DIY Centerpieces - Tape and Tea-lights

 
Looking for an easy DIY centerpiece or favor? Try these tea-lights. How easy is this? This is easy enough your flower girl could help with it! Which makes it a great project if you want to include everyone in your wedding planning and crafting. So simple!
 
How do  you make it? Just wrap some tea-lights with decorative tapes! These tapes come in a variety of colors and designs so don't be put off if your wedding needs bright colors or the black and silver just doesn't work for you. Have fun!
 
Use them as favors or just put one at each place setting. Or group them in the center of your table. So many choices for this easy craft!
 
I'd categorize this EEEBCDI (Easy enough even Bill could do it) but I didn't even make him try it--it's easier than easy! (Followers of my blog know that Bill is my husband who is very non-crafty. I use him to test out each DIY project. Any project that is marked EEEBCDI is truly something simple to make that he has created with no problems!)


Wednesday, September 5, 2012

Personalize It With Your New Monogram

 
Looking for an inexpensive wedding favor or a way to decorate your tables? Try these easy to make candle holders that have combined pale green with lilac, purple and brown. The tutorial can be found on the Dollar Tree website. I guarantee this is easy to make and inexpensive as well.
 
I love things that can be personalized and this simple monogram does the job. So head over to Dollar Tree's web site and see the tutorial. Let me know what you think of the project.
 
This is an EEEBCDI project (easy enough ever Bill can do it) which means it is so simple that even my husband who is less than crafty could pull this off. So if you are a bride (or groom) who is all thumbs, this is the project for you!
 

Sunday, September 2, 2012

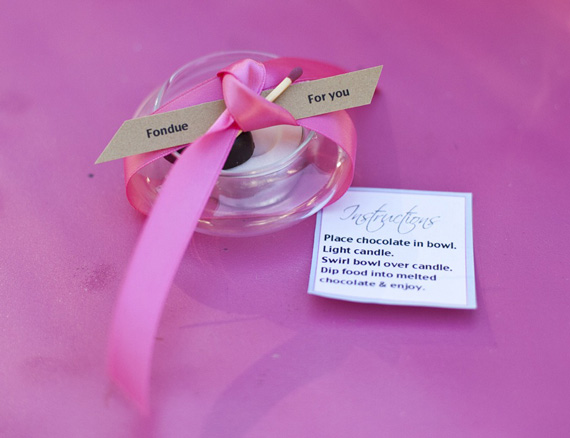
Chocolate Fondue For You - A Dollar Store Craft

Photo courtesy of A Subtle Revelry
 
Do you love Dollar Store Crafts? You know I do. Anything that combines saving money with a usually simple to make craft is right up my alley! (And this one has the addded allure of chocolate so, who can say no?) So today I'm sharing a mini fondue pot idea courtesy of A Subtle Revelry.
 
Do you remember fondue pots? If you grew up in the 70's you are familiar with these pots, (ours was avocado green to match the kitchen and I'm pretty sure my mom got it with Green Stamps...alas, they no longer give those out!) But I digress. Here is a Dollar Store wedding shower favor (or party favor) that is fun and interactive.
 
Make these inexpensive crafts by combining a mini candle bowl or incense burner, a small piece of chocolate, a tea light and a small square of instructions and a match tied on the top with a small note saying 'a fondue for you.'
 
Guests can either use these at your party (you can add more chocolates  and things to dip into the chocolate (fruit? cookies? breads?) or send guests home with them. Either way it's a fun favor for a wedding or shower.
 
How easy is this? This craft earns the EEEBCDI rating. Which followers of my blog know is a rating that stands for 'easy enough even Bill can do it.' This means I've tested this craft out on my non-crafting husband and he has managed to pull it off.  He particularly enjoyed this one (although an awful lot of chocolate disappeared!) So pull in your groom to help with these or even your dad. Yes, men CAN do these!
 
Combine a small piece of chocolate, a tea light and a miniature candle bowl together. Top it off by tying with a pretty ribbon, a label and a small match to light the flame. (If you can't find a bowl at The Dollar Store try your local craft store, my Michael's had some.) See! It is SIMPLE! And fun and inexpensive! What a great combo! Let me know how much fun  you had with these favors.

Friday, August 31, 2012

Easy DIY Project - Quick, Simple and a No-Brainer!

 
Looking for an easy to make wedding favor (or even a way to decorate your tables?) Try these simple votive candle holders, wrapped in a thick yellow ribbon bow with a silk daisy hot glued to the ribbon. Simple right? Yes this is an EEEBCDI project. For the non-crafty out there who need a simple project that looks great this is IT! Simple, fast, and ends up looking great. What more could you ask?
 
**EEEBCDI stands for 'easy enough even Bill can do it.' I test how hard a craft is out on my 'non-crafty' spouse. He really rocked this one! Not to mention for some reason men love hot glue guns! So if you are looking for something your fiance or non-crafty friends can help you with, this is the project for you! Look for other EEEBCI projects throughout my blog.
 

Fruitsicle Desserts For Showers or Healthy Snacks

Photo courtesy of Parents Magazine
 
Fall in love with these heart kabobs or 'fruit pops.'
 
Love the heart shapes (make it perfect for a wedding shower) or even for a wedding day. Just use a heart shape cookie cutter to make the 'hearts' from watermelons, cantaloupe, or honeydew melons. Make an opening with a toothpick. Then slide them onto Popsicle sticks! How easy could it be?
 
If you're a teacher (or a mom) these make great school snacks for Valentine's Day. Add the citrus yogurt dip to make it more fun (and a little messy for the kids!)
 
No matter where you are serving these, the heart shaped healthy snacks will make your guests (or kids) happy!

Looking for more fruit ideas for weddings? Here are just a few of our favorites:


Wednesday, August 29, 2012

DIY Boozy Fruit Centerpieces

 
Possibly the most unusual centerpiece I've ever seen is this 'boozy centerpiece' posted on Offbeat Bride by Catherine Clark (aka Superman)The couple, Drew and Kyle are possibly one of the most unusual I've seen. They took Mason Jars (yes, I know, I can hear the groans...NOT MORE MASON JARS!) Yes, MORE mason jars. But these are better--they are filled with boozy fruit. Can you say YUM?
 
The couple was having a brunch wedding reception and put these out as centerpieces so guests could snack at will. Bamboo skewers allowed each guest to easily access a piece of fruit.
 
How do you make them?
 
"Two months prior to the ceremony, we bought a variety of fruit at the local farmers' market and a bunch of booze (whiskey, gin, vodka, and rum) and made about 20-25 mason jars of alcohol-preserved fruit. We stuck bamboo skewers on the top of the jars we placed in the middle of the tables, and let guests pick at it as they pleased, and take home whatever jars they liked."
 
Sounds simple huh? Dare I say EEEBCDI? For those who read my blog on a regular basis I test DIY projects for how hard they are to execute by having my husband (Mr. Non-Crafter) try them out. Any project that rates at EEEBCDI rating means it's safe to let your groom loose on this project or if you are 'less than crafty' it's a great one for you as well.
 
Love using these as centerpieces or even as favors for your wedding. They are sure to be a hit with your guests whether they eat them during your reception or take them home to enjoy.

Saturday, August 25, 2012

A Practical Guide To Your Wedding - An Unusual Wedding Program

 
Have you ever gotten a wedding program that you just tossed aside and barely looked at? The guide shown above is sure to pique the interest of your guests as they wait for the bride to walk down the aisle.
 
How do you do this? Not only do you need to put the usual info inside but something to grab their attention and make them keep reading. Think of things that are personal to the bride, groom and wedding party. Add some small bits of info to make your guests smile and keep reading as they wait for the wedding to get started.
 
Not only that, this is a perfectly simple wedding program to put together yourself. No fancy graphics, just black and white basics -- practical but fun!

Wednesday, August 22, 2012

DIY Metallic Quatrefoil Luminaries

Photo and Creation by Stephanie Lynn
 
Love this luminary created using a Silhouette machine and some spray paint. To get the look you do need the Silhouette machine. I've seen some on other sites though that used a pre-cut piece of paper as the stencil. So if you don't have a Silhouette already, it might be worth looking for some paper you can use as a stencil instead of investing in the Silhouette. (Yes, I want one too, but... expensive!)
 
You can make these metallic quatrefoil design in a variety of colors and you could even use a different design. The tutorial can be found on this By Stephanie Lynn link.
 
By Stephanie Lynn has a lot of great ideas for weddings or general crafting so take the time to bookmark and browse her site.

Sunday, August 19, 2012

Buckets of Love

Pinned Image
                    Garden Party Garden
Want an easy way to decorate at your rustic outdoor wedding? Just grab some buckets, some garden flowers and some water and a floating candle of two and you are in business!

Yes this is an EEEBCDI (Easy Enough Even Bill Could Do It Project). If you aren't familiar with my blog, Bill is my husband who is handier in a garage or outdoors tha dealing with crafting! 

So if you are looking for something your groom can help with, this is it! Just hand him a hose, a bucket, the flowers and candles and you're off!

Candy Bars, Dessert Bars, Now Popcorn Bars!

Photo and idea for popcorn bar courtesy of TPD Magazine

Bars, bars, bars! Brides and bars go together? Hmm. well that didn't come out quite right, but I'm talking about everything from dessert bars filled with tiny bites that delight your palette, to mashed potato bars and candy bars.

Now, enter the popcorn bar! A combination of sweet and salty additions for basic popcorn, this bar is the perfect addition to a rustic fall wedding.  Order a selection of popcorn seasonings, (Kettle Corn, Apple Cinnamon, Nacho Cheddar, White Cheddar, Ranch, Chili Lime, and Caramel etc.) and a butter spritzer from Kernel Season’s website and add them to some grocery store popcorn.

Your guests will enjoy the DIY creations they put together so each person's popcorn is custom designed by them for their own enjoyment.

Tuesday, August 14, 2012

DIY Thank You Notes -- Peacock Style


Not impressed with sending out Thank You notes that are done in your new initials or that come from  your local card store? Head to extase on Etsy and buy a gorgeous peacock stamp and make your own stationary. Perfect! You can make you own stationary and wow your wedding guests as they open your Thank You note and see your unusual creation. Nothing like wow'ing your guests one more time!

Extase also has a variety of other stamps for your pleasure! Enjoy!

Saturday, August 11, 2012

Unique Table Numbers - Easy DIY Project

Photo courtesy of OnceWed

Looking for a unique table number? How easy is this! Yes it is EEEBCDI (Easy Enough Even Bill Can Do It.) For those of you who have followed my blog, you know I test out just how easy a project is by getting my husband (a great guy who is just craft-clueless) to see if he can duplicate the project. These table numbers were so simple they rated the EEEBCDI rating! Face it, when you're about to get married you REALLY do not want a complex craft to pull together at the last minute! Also this rating means it's a good project to get your groom involved in. Most guys are not into making frou frou projects, but hey, bread... yeah, they can get into that!

Simple Tutorial on Bread Table Numbers:

1. Go to your favorite fresh bread purveyor (Whole Foods, Panera, Wegmans) and buy a loaf of bread for each table. Choose the size based on the size of your centerpiece you'll be placing your table numbers next to. It shouldn't overwhelm your centerpieces.

2. DO NOT (as one bride suggested to me) shellac your bread! I guarantee if you do SOMEONE will try to eat it (not a great idea.)

3. Either using simple calligraphy (not a guy thing usually) or use a computer program to make your table numbers. Print on heavy weight paper and glue onto a heavier backing so the number stands up straight. (You don't want droopy numbers!)

4. Cut a small slice in the top of the loaf of bread and insert the lower corner into the bread. If you are using a smaller loaf on a large table, make more than one per table so you can see it from every direction.

You can use a long loaf of french bread for your place cards which will keep the theme going! I like this idea for weddings with a rustic theme or a picnic wedding.  


Thursday, August 9, 2012

The Secret to Cupcake Bouquets

Cupcake bouquets look so cute as centerpieces for your wedding or bridal shower. But some DIY'ers have reported having difficulty keeping the cupcakes from falling off. What's the secret?


Well the bad news is, gravity works. So if your cupcakes are too heavy and too moist (and you like them moist if you're planning on eating them) they are likely to droop or actually fall off the side of your centerpiece. Cake Central shows you how to keep those cupcakes in place and pretty (and eatable!)


I've used long skewers (depending on the container) or if I'm using a base of styrofoam, I use multiple toothpicks, but Sugar Shack has a better idea that won't destroy the bottoms of your pretty cupcakes as much! You know those little plastic cups that your side of salad dressing comes in at a restaurant? These solve your problem! They effectively hold your cupcake in place by propping it up but are relatively invisible too. Depending on the size cupcake, you'll need with 1 oz (for mini's) or 2oz or 5oz for larger cupcakes.

Another trick? Don't try to cover a ball with cupcakes. Instead cut the ball in half so all you are covering is a dome. This keeps you from trying to keep cupcakes on the side of a ball--unattractive because gravity will pull these down and make them droop (or worse, fall off, everytime.)

Another option? Use a container that naturally supports your cupcakes that are at the side on the lower edges.

Oh, and if you want to know where to get those little cups? Sam's Club sells them. Or if you ask your local restaurant, if they use that size they can usually special order them.  I never knew that until one time we were talking to a manager at one of our favorite chain restaurants and saying how much we enjoyed their soup. He said he'd be happy to order some for us to take home the next time he put in an order! Wow! (Ok, not saying he did it for free, but ... it sure beat making soup from scratch on a night I just ran home from work!) Even places like McDonalds will order things for you like ketchup packets--who knew? (This may vary on the franchise, but wow! Learn new things every day!)