Showing posts with label chocolate. Show all posts

Sunday, September 2, 2012

Chocolate Fondue For You - A Dollar Store Craft

Photo courtesy of A Subtle Revelry
 
Do you love Dollar Store Crafts? You know I do. Anything that combines saving money with a usually simple to make craft is right up my alley! (And this one has the addded allure of chocolate so, who can say no?) So today I'm sharing a mini fondue pot idea courtesy of A Subtle Revelry.
 
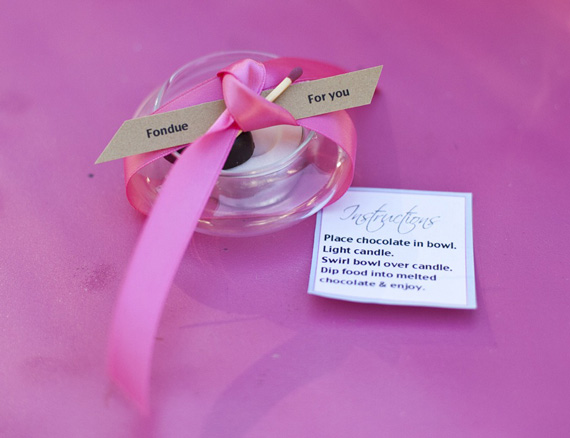
Do you remember fondue pots? If you grew up in the 70's you are familiar with these pots, (ours was avocado green to match the kitchen and I'm pretty sure my mom got it with Green Stamps...alas, they no longer give those out!) But I digress. Here is a Dollar Store wedding shower favor (or party favor) that is fun and interactive.
 
Make these inexpensive crafts by combining a mini candle bowl or incense burner, a small piece of chocolate, a tea light and a small square of instructions and a match tied on the top with a small note saying 'a fondue for you.'
 
Guests can either use these at your party (you can add more chocolates  and things to dip into the chocolate (fruit? cookies? breads?) or send guests home with them. Either way it's a fun favor for a wedding or shower.
 
How easy is this? This craft earns the EEEBCDI rating. Which followers of my blog know is a rating that stands for 'easy enough even Bill can do it.' This means I've tested this craft out on my non-crafting husband and he has managed to pull it off.  He particularly enjoyed this one (although an awful lot of chocolate disappeared!) So pull in your groom to help with these or even your dad. Yes, men CAN do these!
 
Combine a small piece of chocolate, a tea light and a miniature candle bowl together. Top it off by tying with a pretty ribbon, a label and a small match to light the flame. (If you can't find a bowl at The Dollar Store try your local craft store, my Michael's had some.) See! It is SIMPLE! And fun and inexpensive! What a great combo! Let me know how much fun  you had with these favors.

Monday, January 2, 2012

DIY Chocolate Spoons


Chocolate Spoons! OK, I'm hooked! It doesn't take much but these beauties not only sound good, they look and taste good as well.  The chocolate spoons are the brainchild of the author of Delicious, Delicious, Delicious.  Make them for a wedding or other special party and hear your guests Ooo! and Ah!. 


Don't you love all the toppings?  My favorite topping is the pink topping called Apollo Choco--even if you're not going to use them for these spoons they'd look great on cupcakes.  (You can purchase these pink and chocolate pretties on Amazon.com although they look like they have a slightly different shape.)


Start with some pastel colored plastic spoons.  If you're doing a wedding sweet table choose some of the wedding colors or other coordinating colors.  I warn you, before you pour the melted chocolate in, you'll need to prop up the handle of the spoon so the chocolate doesn't all run out.  Try a few magazines or a book that's just the right height.  (I suggest some you don't care about, because if you're like me you'll end up spilling some chocolate as you work!)


Next choose some quality chocolate and melt it.  It's up to you what quality you go for, look at your budget, but be sure to taste test the chocolate and be sure you're using some that will wow your guests taste buds.


The author of Delicious, Delicious, Delicious suggests these fancy bars, but almost any quality chocolate will do.  Some readers suggested substituting Nutella, a comment that was met by raves! It seems there isn't anyone who doesn't love Nutella, and for those of us in the United States, it's a lot easier to get than Italian Chocolate bars.  Melt the chocolate in a double boiler or in the microwave over water. 


Fill each spoon with chocolate and decorate with dragees, jelly beans, any small chocolate candy (like M&Ms, Apollo Choco (the pink and brown candies shown), or jelly beans.  Add dragees and pearls and any other toppings that you love.  Just wait about 10 minutes for the chocolate to cool so that the candy doesn't melt as soon as you put it into the chocolate. 


Voila! The perfect addition to your sweet table! Easy to make in an evening.  Just don't eat them all the night you make them!  Once again, thanks to Delicious, Delicious, Delicious for the photos and the basic tutorial.  For brides (or anyone reading this) be sure to head over to Delicious, Delicious, Delicious to see all the other great ideas they have posted there.