Sunday, December 30, 2012

Gold Glitter Votives

 
Looking for a fun and easy way to decorate the votives for your tabletops for your reception? Visit 100 Layer Cake for the tutorial on these beauties! Some gold glitter, modpodge, clear votives and you're good to go! Designs can be random or just the top edges or the bottom half of your votives, or just mix and match them. What a great look for a little bit of money.
 
While you are checking out their tutorial for these votives you are sure to want to spend some more time (more like hours) going through the rest of this great creative site. Enjoy!


Saturday, December 22, 2012

DIY Floating Canopy For Your Wedding

Photo and directions from Home Interior Ideas
 
Looking for a unique way to mark your wedding location in your local park or back yard? Why not try this canopy that floats courtesy of multiple balloons. How do you do it? The balloons are attached to the grounds using fishing line, invisible but strong. How cool is this? I think this is one of my favorite do it yourself outdoor wedding ideas.
 
Arrange your ceremony under one end, your reception at the other, or use one half the canopy for your ceremony and chairs for your guests to relax on, and the other half for the reception. No matter how you decide to arrange the details the overall look is striking.


Monday, December 10, 2012

Sealed With A Kiss? Nope, A Label.

Mail details courtesy of I Still Love You
 
Do you love those little details but don't have the time or skill to add them yourself? Or you lack the calligraphy skills to do these by hand? Melissa Esplin from I Still Love You has figured out a quick and easy way to use your printer and Avery Labels to let you give your invitations a classic look. Not only that she provides you with a free download on her site. So head over there now and see just how simple this is.
 
I tested this on my husband Bill (of (EEEBCDI) Easy Enough Even Bill Can Do It fame.) For new readers, my husband tests my DIY projects to see just how easy they are to do. He's not at all crafty and not graphically inclined. It's a good thing I only had a couple of sheets of clear labels left or he would still be in there printing these! He loves an easy project. So if he can do it, you can too, or your fiance can. No more waffling out of pre-wedding projects by saying 'it's too hard.' This one is EEEBCDI, so if Bill can do it he can do it too!


Ribbon Cupcakes You Can Make Yourself

 
Looking for an easy cupcake to make for weddings or wedding showers? Try these easy cupcakes decorated with colored bows. Simple to make, but so attractive your guests will rave. No matter what color your wedding theme is, you can make these Wilton Sugar Sheets and a rotary cutter, also by Wilton.
 
 
Sugar Sheets also come in a variety of decorative patterns that may be perfect for your occasion. Make everything look special using Wilton tools and supplies.
 
Looking for some guidance using these products? Check your local craft store or kitchen supply store that sells Wilton products.
 

Sunday, December 2, 2012

Spell Out Your Love With DIY Love Blocks

 
If you are planning a romantic centerpiece, Six Sisters Stuff has a great tutorial on how to make these 'Love Blocks.' Depending on how you size them you can use them at each place setting or as part of a centerpiece. Combine with some votives in similar colors and you're ready to rock!
 
I love the variety of black and white backgrounds with the bright red accents, use them for a Valentine's Day wedding or any wedding that black, red and white accents will coordinate with. No doing those colors? Just change out the colors to some that work with  your wedding theme colors.
 

Wednesday, November 7, 2012

Salted Caramel Sauce To Die For!

 
Always with Butter, a blog to die for (at least if you aren't on Weight Watchers!) has this lovely recipe for this soft and luscious salted caramel sauce that is perfect for a wedding favor in the fall. It's soft and gooey and oh so so good. Even if you aren't having a wedding or shower that you need a favor for, you REALLY want to make this sauce. (My husband couldn't keep away from it while I was making it!) It smells and tastes great and looks really good too--what more could you want? Well calorie or fat free would be good but the taste would be ruined so... just enjoy and work it off the next day. Your guests will love it and so will you! 
 
To find the recipe head over to Always With Butter. You'll enjoy this recipe and want to try more of their other recipes as well. Enjoy your salty caramel sauce--and share (I know, it will be hard..but...)

Saturday, November 3, 2012

A Smart Bride's Way To DIY

 
Have you considered making centerpieces out of glass for your wedding day? The Butterfly Cloche above from Country Living Magazine would make a great highlight for a wedding featuring butterflies or nature themes. For the tutorial (and other great craft ideas) go to Country Living Magazine.
 
 
No bride wants to get so bogged down in a diy project that her wedding planning starts to become work. For a bride planning a DIY wedding, choosing extremely difficult or time consuming projects takes away the fun factor!
 
If you are looking for a less formal look, try these mini domes. They are made using glasses (turned upside down of course) with tiny keepsakes inside. Personalize your guests' wedding tables with 'a few of your favorite things.' To find the tutorial go to Country Living Magazine online. I love the personal look these give you. You don't have to use them for all the tables, but they would be cute added to your guest book table or other side table.
 
The best part of these DIY projects? They are rated EEEBCDI (easy enough even Bill can do it).  For those of you just starting to read my blog you may not realize I am not crafty, but my husband is worse. I mean he's great at some things, fixing things, putting things together, but not tiny little projects like this. So I test out the ease of the tutorial by having him try them out. If it's rated EEEBCDI, your groom should have no problem either, which makes these projects all the more fun. Or if you are all thumbs, they will be easy enough you can do them without the stress no bride to be needs during her wedding planning! Have fun, that's the whole point of this!


Friday, November 2, 2012

Grandma's Mustache In Wedding Photos

 
Do you love this idea? Originally from Paper + Craft, a great book available on Amazon or from your local independent bookseller, it was published online on Etsy's link (see below the photo).
 
Can't you just see the great photos of you and your groom? Not to mention your guests and grandmothers! Add lots of fun to your wedding without adding a lot of cost. You can make these yourself and just add them to your drinks! This one is perfect for pink lemonade! Get some great color straws and get to work! Click the Etsy link to get the tutorial.
 
Go and pick up your copy of Paper + Craft by Paper+cup Designs, Minhee Cho at your local independent bookseller or order from Amazon. Your independent may not have it in stock but they can order it for you and you'll be supporting your local economy.

Monday, October 22, 2012

Let It Snow - DIY Winter Wedding Centerpieces

 
Tracie at Cleverly Inspired made these wintery centerpieces from three empty wine bottles. She added some holiday ornaments (also with some 'snow' added) and some votive candles, and placed them all on a tray. Voila! A perfect centerpiece for a wintery wedding!
 
You won't believe what you use to make this--some craft bond spray adhesive (try your local craft store) and Epsom Salts. (If you don't have a box at home already, check near the first aid aisle in your pharmacy.  No fancy fake snow flakes...just epsom salts! Tracie is so clever! Of course you'll need some help drinking all the wine so you have enough wine bottles, so sounds to me like it's time for a PARTY!
 
Be sure to take the time to visit Tracie's blog to get the whole tutorial, not to mention see all the other great ideas she has that are quick and easy.

Saturday, October 20, 2012

Peacock Wreaths For Your Wedding

 
I admit, I tried this first without finding a tutorial--big mistake! Because what I didn't realize was you needed a base of green chandelle or turkey feather boas, once I figured that out the rest was so easy you may not even need the link for the tutorial that I posted under the photo of my wreath. Granted, they hung their wreath using a purple satin ribbon, but since I was making mine to add to my 'collection' of peacock feather decorations for weddings, I left the ribbon off.
 
Two critical tips for my success: First: be sure to let the paint dry before you try to attach anything, rushing it will not work. Second be sure to use spray glue, it's so much easier with feathers than hot glue or other craft glues.
 
This is time consuming the first time but if you are making several, by the time you get to the last one you'll be cranking them out pretty quickly. I tossed the first two I tried (one, I didn't let the paint dry, the second, I tried to used hot glue and made a huge mess!) But after that it was pretty easy.
 
Be sure to work where you have plenty of ventilation (I ended up using my front yard.) My neighbors were intrigued. But now my grass has some paint on it (one good reason to work outside, it's not on my floors. Just do it on a calm day and stay away from your cars.) Good luck, have fun and enjoy your wedding day.

Friday, October 19, 2012

Candymaking for Wedding Favors

 
Want to give a wedding favor that has the personal touch? Brit + Co. shows you how to make your own candy combining candy you can easily find at your favorite store and combining them so you have a decorative product when you are finished.
 
What do you need?
 
Materials:
- candy bars (above photo used a combination of Snickers, Twix, Milky Way, 3 Musketeers, Reese's Peanut Butter Cups, and Hershey's Cookies n' Creme Bar)
- Starburst
- Airheads
- a sharp knife
- rolling pin (even better if you have a mini one!)
- aspic mini cookie cutters (I got mine on Amazon, but you can pick them up in your local brick and mortar stores as well to save on shipping.)
- clear gift bags
- string or ribbon (I prefer ribbon, the kind that curls)
 
Cut your candy bars into bite size pieces (no snacking, I saw that!). Next you need to roll out your Starburst and Airheads. They need to roll flat enough that you can use the mini cookie cutters to cut our decorations with them.  Cut out your favorite designs (I like the hearts. What can I say, I'm a romantic!)
 
 
Place the finished products in clear plastic bags, decorate with a tag, and tie with string or ribbons. Ta Da!


Wednesday, October 17, 2012

DIY Favor Boxes

Favor Boxes photo courtesy of Wedding Friends
 
Looking for an easy DIY project for your wedding? These favor boxes, courtesy of Wedding Friends, are easy to put together and fill with your favorite candy or other goodies. Wedding Friends gives you a printable that you can print yourself or take to your local print shop. Choose a heavier weight paper than your usual printer paper because you need it to hold up better. The link for this printable is at Wedding Friends as a PDF document.
 
While you are there don't forget to check out all their other great wedding ideas.
 

Tuesday, October 16, 2012

Pastel Folding Chairs

 
There's nothing I like better than a DIY project that is easy, fun, and looks great with minimal work--just my style! Do you have some old, ho hum brown or gray folding chairs? Or chairs that have nicks and scrapes accumulated over the years that need to be repainted? Kelly, the genius at The Moon and Me shows you how to spray paint your folding chairs and make them part of your decor.
 
Having a pretty pastel garden wedding? The chairs shown above would be perfect! Kelly recommends Krylon, but you can read her review of the other paints she tried and see what you think. She suggests 2 cans per chair. So what do you think?
 
I think this is an easy way to take a wedding from ho hum to WOW! And it's so easy even my non-crafty husband can do it. It definitely rates a EEEBCI rating (Easy Enough Even Bill Can Do It). It's a great project for grooms to do while you're busy doing something else! Start early and you can pick up inexpensive chairs at yard sales or Goodwill.

Sunday, October 14, 2012

Easy 2 Ingredient Strawberry Fudge

 
Looking for an easy to make fudge to use as a wedding favor for your wedding? Cookies and Cups has more than one fudge recipe but this one is super easy (only 2 ingredients), and it turns out pretty AND delish.
 
Not looking for pink? Or strawberry flavored fudge? Or watermelon fudge? Or key lime fudge? Trust me, Shelly has more! Just type in the word fudge in her search option and you're off!
 
Take your time browsing through Shelly's blog and you are sure to find a long list of fun and easy recipes for to take along when you're a guest or just to enjoy for a special occasion at home.
 
I can see taking some watermelon fudge along for 4th of July (when your sister has drawn the job of  hosting the family barbecue and insists she doesn't need a thing, but you just have to take something!) The watermelon fudge is perfect for that summer party when you just can't envision a party without watermelon!
 
Head to Shelly's blog, Cookies and Cups to find the secret ingredients for the 2 Ingredient Strawberry Fudge, then enjoy!  You may not even need to head to the grocery store for the ingredients--how easy is that? And you are sure to be hooked on some of her other easy recipes, perfect for busy moms who want to involve their children in cooking!


Saturday, October 13, 2012

Tutorial on Making Your Own Wedding Cake

 
Are you that brave bride (or mother of the bride) who is taking the huge step to make your own wedding cake? If so you want to head to Epicurious' tutorial. They have step by step directions plus a recipe for a Lemon-Raspberry Wedding Cake and a video to help you through every step from start to finish. With wedding cakes costing at least $400 (and that's a low estimate) making your own cake can save quite a significant amount of cash. (In my case it wasn't I was too chicken to make the cake, it was transporting it that made me hire someone!) I could just see all the layers smashed on the floor of my Tracker! NOT! At least not for my daughter's wedding. I don't want to try something for the first time when it's an important occasion and one where I'll be busy running around as it is. But if you are a gutsy bride, give it a try. Epicurious gives you all the info you need to pull it off.
 

Sunday, October 7, 2012

Easy Fondant Roses


Make these gorgeous roses from fondant/gumpaste to decorate the tops of  your cupcakes (or cakes). These are remarkably easy, just need a little patience and the right materials. Watch the tutorial, and give it a try.

I suggest reading the comments, it might make your project go a little more smoothly and/or just make it go faster.  Some info I found useful: be sure you don't place these in the sun to dry, the color will bleach out, also do not put the flowers in the refrigerator. Place the flowers on the cupcakes right before placing on display on your dessert table. You can use an egg carton in place of the plastic watercolor palette, not sure if the cardboard would absorb the dampness faster or not, just a thought.

***Most important: THAT IS NOT NAIL POLISH or EGGS used at the end to stick the white 'pearls' in the center. Obviously (or at least I thought obviously, but some people missed it) raw egg is not something you want to serve guests (can you say salmonella?) and neither is nail polish. (Shaking my head is wonder that anyone would think to use nail polish on something they were eating!)

I recommend doing a trial run or two before a special occasion so you have it down to a science!  How hard are these to make? They definitely are not EEEBCDI (Easy Enough Even Bill Can Do It), (anyone who reads my blog knows that my husband Bill tests out my craft ideas so I know which ones a total novice can handle.) This one requires more patience than he has for anything craft/or food prep related. So be prepared to put a little more work into it.

Enjoy the YouTube video by Cakes By Merry. And look for other tutorials by the same author on YouTube.

Friday, October 5, 2012

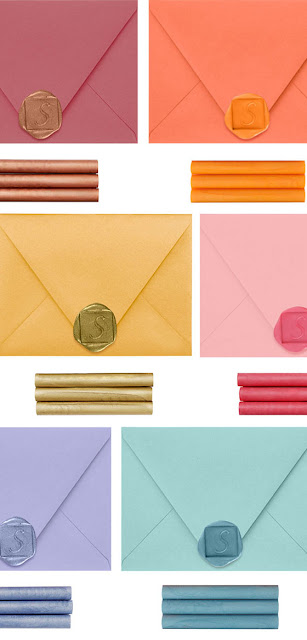
The Extra Touch For Your Stationary

Photo and tutorial on Inspired Goodness' blog (link below)
 
 
Want perfect seals for your wedding invitations or notes? See how to make this on Inspired Goodness' blog. 
 
What do you need? Just a glue gun, glue gun wax, wet paper towel and aluminum foil!
 
Glue Gun Wax is very easy to work with, is available in a large assortment of colors and can be used with any standard glue gun. They suggest that the round seals are easier to use, but it's your call. Be sure to read their whole tutorial for those important 'secret' details.
 
I love the look of the seals on wedding invitations and thank you notes don't you? And since it's easy, it adds a nice touch without a lot of extra work.

DIY Mirror Backdrop

(Photographer Tess Wilson for Apt. Therapy)
 
What a perfect background for a DIY Photo Wall for your wedding. Just pose the bride and groom goofing around in front of the backdrop, or their guests in glittery disco-esque looks for a fun DIY photo wall. Kind of an open photo booth! To see how to hang up your mirror garland (you can purchase it here) at Party Oasis. Then all you need are a few hooks, an aluminum rod, and some lights.
 
Need exact directions? Head to Apartment Therapy for their tutorial and see just how easily you can pull off this look for your wedding (or other party.)  They also have lots of other great ideas for your first home together. So head on over and settle in for a nice long reading session!

DIY Organic Table Numbers and Placecards

 
How simple and inexpensive can this DIY project be? Austin Wedding Blog uses an assortment of colors of cherries, go red, or golden, make small 'flags' to put around the stems and use your computer to type names on them in a cursive font before you cut them out and glue them around the stems of the cherries. Do the same to put the 'table number' on each cherry.  Put the number of cherries on the saucer of the people sitting at the table plus one.
 
Choose a pretty saucer for a romantic garden party look. Either pick up saucers from friends and family or hit Goodwill or the your local garage sales. Inexpensive but pretty! (Not to mention edible!)
 
Be sure to take some time to browse through this blog, it's full of great ideas that aren't too hard to execute.

Sunday, September 30, 2012

Rose Petals and Tabletops - Easy DIY Project

 
Scattering rose petals on a tabletop adds 'something extra' to your tablescape, but here's a great way to do use rose petals that will pull everyone's attention to your decor. Grab your hot glue gun and your silk rose petals and glue them to the table runner or organza overlay! Simple. (Though not necessarily fast).  Be sure to leave ample time for them to dry and don't use too much glue or the material will be glued to whatever is underneath it. You can also make bows for the back of the chairs for the bride and groom that are covered with rose petals. Just don't overdo it. If you think doing this on every table is too much, consider using it for your cake table.
 
Every wedding is memorable for different reasons. Some for the entertainment, some for the great venue, some for the inventive food--but every event should have some memorable very special decorations. If you use this rose petal runner you don't need expensive centerpieces, a simple silver vase with a small floral arrangement or some silver candlesticks will finish off the look. 
 
Don't forget to use rental products when you can instead of purchasing everything. The runner or overlays you will need to purchase because you'll be adding the rose petals to them--which means you get to keep them! (Not sure what you'll do with them later, although one would be great for Valentine's Day celebrations.)  


Go Green With Your Gift Bags

Photo and tutorial at Made By Teens
 
Having a 'green wedding?' (or at least making the effort?) Why not make your own out of town gift bags? The gift bags shown are made from newspapers with some doilies and ribbon (oh yes, and a little glue.) For the full tutorial head to Made By Teens and see the step by step directions.
 
Why enrich Hallmark or American Greetings when you can do it yourself and not only save $$ but impress your guests with your thoughtfulness by doing it yourself?
 
Fill the bags with packets of granola,  Santé nuts, bottled water or a bottle of Honest Tea, the ideas are limitless! (And don't forget if you have guests bringing children pack them their own bag including Happy Tot Juice from Happy Family or some of their great organic munchies.
 
Be sure to add maps of the area, some ideas for tourists (we're lucky, we live near Philadelphia, so there is no shortage of ideas), ideas for local restaurants (including some that are family friendly.) Make your guests feel at home. You know you will be super busy the day before and day of the wedding so preparing these bags ahead of time makes them feel like you are thinking of them even at your busiest.

Halloween Wedding DIY Project Idea

Photos and idea from Balancing Home
 
Planning a Halloween wedding? Here's the perfect decoration... if you are looking for the spooky look without breaking the bank. The author of Balancing Home designed these fabulous glow in the dark pumpkins using Tulip Glow In Dark Puffy Paints and some pumpkins she found in Target in their 'dollar aisle!
 
Photo credit same as above
 
Read Megan's post on how to achieve these cool but really easy accents for your Halloween Wedding. Don't you love the photo of what the pumpkins look like in the dark?
 
BTW, this project definitely meets my EEEBCDI criteria! (Easy Enough Even Bill Can Do It) Better known as my less than crafty husband could do this project and have it come out looking great!

Saturday, September 29, 2012

Tubs of Flowers

Photo courtesy of Samplers and Santas
 
Looking for easy flowers for an outdoor wedding? Marly, the wizard (hmm well whatever a female wizard is called) behind Samplers and Santas has solved the problem for brides planning an outdoor wedding who want and easy and inexpensive way to decorate with flowers.
 
The real genius behind this project? You can use it for years after your wedding, just change out the flowers. I do love a project that has longevity!
 
Visit Samplers and Santas for other great ideas as well as for the tutorial on how to pull of this project, (I assure you is one of my "EEEBCDI" ("Enough Even Bill Can Do It") project.)
 
If you can stick the shepherd's crook in the ground, shop for the galvanized tubs (or get the ones out of your garage that you've been tripping over all winter) and choose some flowers you're in business! Oh and then there's the 'secret rock' tip that you can't find out about without going to Marly's web site. (this is a critical tip so don't miss it!)
 
These tubs are great for marking the ceremony area or to use as a backdrop. I can't wait to head out to get some galvanized tubs so I can make some for my yard (even though we're not having a wedding here!)

Wednesday, September 26, 2012

Mini Sweets You Can Make Yourself

 
Love cupcakes? Love ice cream cones? Here's a combo in these mini cones of cake and icing and those so cute mini cones. They have added edible glitter to the cones to top them off and take them from ordinary to extraordinary.
 
The cones can be ordered from Home Chef Marketplace so all you have to do is add the cake batter, bake and top with butter cream and sprinkles. (Oh, and be sure to find a rack to hold them up!) And if you head over to Martha's web site you'll find the link for the cake recipe. How easy can she make it? Everything available.
 
As a mom I've made cupcake cones for my kids at school, but never quite this fancy. Enjoy!

An Apple A Day?

 
Looking for a fun thing to serve for the kids at your wedding reception? OK, so you know they'll eat chicken fingers, but this apple treat is perfect for snacking for them, either as an appetizer or a dessert. El hada de papel gives you the simple tutorial on how to make these.
 
When I first saw it I thought it was a heart painted on the apple, may be with a red icing paint. But when I looked at it more closely I realized it was made from two apples, one red, one green.
 
They used a simple cookie cutter in the shape of a heart to cut out a red heart shape and insert it into the green apple. Wow! Cute and fun. Frankly I know some adults who wouldn't be averse to these pretty apples. Great fun for weddings or even for moms or school teachers. I love it when something has multiple uses!

Saturday, September 15, 2012

DIY Thrift Store Vases


Thrift shops and garage sales are a great resource for decorating at your wedding reception. Why spend a fortune on vases when you can pick up some inexpensive vases at a thrift store or garage sale, add a little paint, and voila! You have a centerpiece that is pretty and will coordinate with your wedding colors.
 
Don't forget, mint and coral are big colors this year, so even if your bridesmaids are wearing a neutral color, use vases is these au courant colors and it will give you a nice pop of color without forcing them to own a dress that shouts "BRIDESMAID!" Believe me, they will thank you!
 
Be sure to spend some time reading Little Gray Fox and Little Foto Fox for more great ideas for DIY projects and more.


Friday, September 14, 2012

The Perfect Mini Appetizers You Can Make Yourself

Photo (cover of book by Peter Callahan)
 
I know, I've posted these cute spaghetti and meatball appetizers before, but at the time I didn't have a recipe for them. As promised, here is the source!
 
As I was watching television this morning, I came across Kathy Lee and Hoda and these great mini appetizers--and Peter Callahan's book, Bite by Bite. Of course I only saw it at the very end, so I had to scramble to find out the book's name! Here it is.
 
I'm sure this book is available online but I'm sure it is also available at your local independent bookseller as well. If not, have them order it for you.
 
(Putting in a plug here for your friendly local independents, support them.  They work hard to provide your community with a gathering place that encourages you and your children to read!) I always like to support my local businesses. Check and see what the closest independent bookseller is to where you live.
 
If you live in  the Collegeville area, visit Towne Book Center and order one from them if they don't have it in stock. Ask for our favorite bookseller, Pam Brown Margolis, although if she isn't there any of her great associates can help you out.
 
Can't wait to try these appetizers out on a crowd. Not sure if I'm going to wait for Thanksgiving or just plan a party before then.
 
I loved the checkerboard that the meatballs on the cover are served on. This is a perfect DIY project that will make your appetizers look even better! Food isn't just about the taste, it's visual too. (And there are no calories in the visual part of eating!)

DIY Mason Jars Go For The Gold

 
Gold mason jars? Sure why not? If you've been following the DIY Wedding world, you know that everything and anything is being done with mason jars.
 
This time mason jars 'go for the gold' as brides turn them metallic using spray paint. Some brides are using them for vases--an easy way to add glitz without renting some fancy stuff from the rental companies or using your family heirlooms.
 
 
Photo from Style Me Pretty/Photographer Pictilio
 
Mason jars gone gold let brides take their DIY centerpieces up a notch while still retaining that 'down home' feel. Go gold, go silver, go bronze, or mix the three. Whatever works for you.
Photo and tutorial from Lovely Little Details
 
 
I've seen photos on Pinterest of these metallic mason jars being used to drink from. I love the look, just not sure if I'd want to chance it.  But for decorative vases they rock! It's up to you if you want to take the chance on drinking from them.


Monday, September 10, 2012

Plan A Weekend of Beauty with DIY Products

Photo pinned on Pinterest from this link
 
 
Your bridesmaids have helped you do everything from choosing your dress to helping with DIY favors and decorating for your wedding, now it's time to pamper them a little. Can't afford a full day at the spa for them all? Not to worry, I have your answer! I admit, I found the answer on Pinterest... where you can find ANYTHING!
 
After I found this strawberry peppermint foot scrub on Pinterest, I tracked it down to Erika Katz's book and web site--wow! pretty isn't it? And the best part? Not only does it look and smell good, it works!
 
Why not make some as a pre-wedding gift for your bridesmaids--just a kind of tiny thank you for all their help. Either that or get together for a 'girls only' weekend. In the middle of all the pre-wedding insanity a day of pampering will make you all feel better. And you know what they say, if your feet feel good, you feel good!
Erika Katz, the author of Bonding Over Beauty,(and a web site of the same name) has some great recipes on her web site that you can have fun making and using as a group for a girls weekend of beauty. You can also find face masks, body scrubs and a variety of other DIY recipes on the Bonding Over Beauty site.
Keep in mind that these won't last forever, so make them and use them up, the DIY beauty recipes will tell you how long they will last.
 
Here's Erika's recipe for Strawberry Peppermint Foot Scrub
 
Strawberry Peppermint Foot Scrub
 
Ingredients:
 
§ 2 cups pureed strawberries
§ 1 tablespoon of olive oil
§ 1 tablespoon of vegetable oil
§ 2 tablespoons of granulated white sugar
§ 4 drops peppermint essential oil
 
To Make:
 
Mix all the ingredients well and put into a pretty jar. It’s great to use strawberries in this recipe because they are rich in salicylic acid which helps dead skin shed more easily. The sugar granules also help to exfoliate skin but are super gentle on delicate skin. You can also keep this recipe in the fridge for up to one week.
To use your scrub, simply rub your feet gently in a circular motion, rinse with warm water, and enjoy the results!


Sunday, September 9, 2012

Pickled Asparagus For Picnic Weddings

 
Having a picnic wedding? Or an outdoor garden wedding? Need some tasty treats to serve as appetizers?
 
Why not make some pickled asparagus? These delish veggies offer the tang of pickles but with a twist. Plus they are a little bit more 'gourmet' than your garden variety pickles. Consider wrapping them in prosciutto--yum!
 
The recipe is also courtesy of Chef's Forum which is a great place to visit and click through all their other great food ideas.
 
Ingredients:

30 asparagus spears
1/3 cup coarse salt
2 quarts cold water
1 2/3 cups distilled white vinegar
2/3 cup sugar
1 teaspoon coarse salt
1 teaspoon mustard seed
1 1/2 teaspoons dill seed
1 white onion, sliced into rings
1/2 teaspoon chili pepper flakes
2 sprigs fresh dill

Directions:


Trim the cut end of the asparagus spears, and cut into 3 inch lengths. Place in a large bowl with 1/3 cup salt, and cover with water. Let stand for 2 hours. Drain & rinse under cool water, pat dry.

Sterilize two pint size wide mouth jars in simmering water for 5 minutes.

In a saucepan over medium heat, combine the vinegar, sugar, 1 teaspoon of salt, mustard seed, dill seed and onion rings. Bring to a boil, and boil for one minute.

Pack the asparagus spears, tips up, in the hot jars leaving 1/2 of space from the rim.
 
Tuck one dill sprig into each jar, and sprinkle in 1/4 teaspoon of red pepper flakes.
 
Pour hot pickling liquid into the jars, filling to within 1/4 inch of the rim. Wipe rims with a clean damp cloth, and seal with lids.
 
Process in a boiling water bath for 10 minutes.

Cool to room temperature. Check seals when cool by pressing the center of the lid. It should not move.
 
Label and date; store in a cool dark place. If any jars have not sealed properly, refrigerate and eat within two weeks.
 

Saturday, September 8, 2012

DIY Centerpieces - Tape and Tea-lights

 
Looking for an easy DIY centerpiece or favor? Try these tea-lights. How easy is this? This is easy enough your flower girl could help with it! Which makes it a great project if you want to include everyone in your wedding planning and crafting. So simple!
 
How do  you make it? Just wrap some tea-lights with decorative tapes! These tapes come in a variety of colors and designs so don't be put off if your wedding needs bright colors or the black and silver just doesn't work for you. Have fun!
 
Use them as favors or just put one at each place setting. Or group them in the center of your table. So many choices for this easy craft!
 
I'd categorize this EEEBCDI (Easy enough even Bill could do it) but I didn't even make him try it--it's easier than easy! (Followers of my blog know that Bill is my husband who is very non-crafty. I use him to test out each DIY project. Any project that is marked EEEBCDI is truly something simple to make that he has created with no problems!)


Wednesday, September 5, 2012

Personalize It With Your New Monogram

 
Looking for an inexpensive wedding favor or a way to decorate your tables? Try these easy to make candle holders that have combined pale green with lilac, purple and brown. The tutorial can be found on the Dollar Tree website. I guarantee this is easy to make and inexpensive as well.
 
I love things that can be personalized and this simple monogram does the job. So head over to Dollar Tree's web site and see the tutorial. Let me know what you think of the project.
 
This is an EEEBCDI project (easy enough ever Bill can do it) which means it is so simple that even my husband who is less than crafty could pull this off. So if you are a bride (or groom) who is all thumbs, this is the project for you!
 

Sunday, September 2, 2012

Chocolate Fondue For You - A Dollar Store Craft

Photo courtesy of A Subtle Revelry
 
Do you love Dollar Store Crafts? You know I do. Anything that combines saving money with a usually simple to make craft is right up my alley! (And this one has the addded allure of chocolate so, who can say no?) So today I'm sharing a mini fondue pot idea courtesy of A Subtle Revelry.
 
Do you remember fondue pots? If you grew up in the 70's you are familiar with these pots, (ours was avocado green to match the kitchen and I'm pretty sure my mom got it with Green Stamps...alas, they no longer give those out!) But I digress. Here is a Dollar Store wedding shower favor (or party favor) that is fun and interactive.
 
Make these inexpensive crafts by combining a mini candle bowl or incense burner, a small piece of chocolate, a tea light and a small square of instructions and a match tied on the top with a small note saying 'a fondue for you.'
 
Guests can either use these at your party (you can add more chocolates  and things to dip into the chocolate (fruit? cookies? breads?) or send guests home with them. Either way it's a fun favor for a wedding or shower.
 
How easy is this? This craft earns the EEEBCDI rating. Which followers of my blog know is a rating that stands for 'easy enough even Bill can do it.' This means I've tested this craft out on my non-crafting husband and he has managed to pull it off.  He particularly enjoyed this one (although an awful lot of chocolate disappeared!) So pull in your groom to help with these or even your dad. Yes, men CAN do these!
 
Combine a small piece of chocolate, a tea light and a miniature candle bowl together. Top it off by tying with a pretty ribbon, a label and a small match to light the flame. (If you can't find a bowl at The Dollar Store try your local craft store, my Michael's had some.) See! It is SIMPLE! And fun and inexpensive! What a great combo! Let me know how much fun  you had with these favors.

Friday, August 31, 2012

Easy DIY Project - Quick, Simple and a No-Brainer!

 
Looking for an easy to make wedding favor (or even a way to decorate your tables?) Try these simple votive candle holders, wrapped in a thick yellow ribbon bow with a silk daisy hot glued to the ribbon. Simple right? Yes this is an EEEBCDI project. For the non-crafty out there who need a simple project that looks great this is IT! Simple, fast, and ends up looking great. What more could you ask?
 
**EEEBCDI stands for 'easy enough even Bill can do it.' I test how hard a craft is out on my 'non-crafty' spouse. He really rocked this one! Not to mention for some reason men love hot glue guns! So if you are looking for something your fiance or non-crafty friends can help you with, this is the project for you! Look for other EEEBCI projects throughout my blog.