Wednesday, June 27, 2012

Leather Cuffs For Your Bridesmaids


Char at Crap I've Made... has a great tutorial on how to make these upscale edgy leather cuffs that make great bridesmaid gifts or great jewelry for the bride who wants to add an urban edge to her wedding day.

I've done posts on Dollar Store DIY projects, but I may need to start considering doing some from Claire's. That's where Char got some of the bling on these leather cuffs. She has some other sources listed on her site too!

Hobby Lobby or the Leather Store is the source for the leather strap for the cuff. Char has several ways to dye the leather depending on the color you are looking to achieve. I can't decide whether I like the blinged out versions or the ones with the roses...hmmm..what do you think?


Char said she got the idea while visiting the Kentucky Museum of Art and Craft where she saw similar cuffs being sold for $130! Wow! These are much more cost concious, but if you don't feel like going the craft route you can probably contact the museum to buy one of the upscale cuffs.

She recommends Hobby Lobby as a great source for your leather making goods like the leather cuff and the leather string and dye, so if you aren't an experienced leather worker who has their own source you know where to go. I suspect your local craft store might also carry some of the items you need.

The bling came from Claire's (that mall store filled with cheap and occasionally tacky jewelry) but any of those teen clothing stores probably carry something that would work. Char used some of those stretchy rings that you see everywhere that were on clearance.

So head out to get your leather cuff and bling and get to work creating works of art for your bridesmaids or for you to wear at your wedding. For a complete tutorial visit Crap I've Made...sometimes it's amazing and sometimes it's just crap...

Tuesday, June 26, 2012

Short on Cash, Long on Love Dollar Store DIY Project


How can you take a few sheets of scrapbook paper, some skewers from your kitchen and toss them in an old glass bottle for a wedding centerpiece? Easy!

Yes, this is another Dollar Store **EEEBCDI craft for brides looking for an inexpensive DIY centerpiece or even the new apartment owner who is short on cash, long on love!

If you can draw some hearts freehand (or if you are totally non-artistic find some hearts to trace) onto some scrapbook paper and cut them out you can make this project. Choose a black, white and tan look like the one above or use hot colors or pastels to coordinate with your wedding.


Use a black ink felt tip pen or cartridge pen to write an appropriately loving sentiment on one or two of the hearts a la "conversation hearts."

Tape the hearts back to back with the skewer in the center (Love double sided tape for this project) and then glue a small button in the center.

Toss a combination of hearts in a glass bottle. We went to Whole Foods and bought some bottles of Joe Tea Half and Half. (Oh and you have to be able to drink the contents of the bottle or dump it down the drain) and tie a piece of twine around the top.

You can also use any other glass bottle from soda or juice, just find one that is relatively tall. Whole Foods sells Fizzy Lizzy, these bottles are slimmer and taller than Joe Tea  bottles are, it all depends on your choice of shapes.


How easy is that! The hardest part was choosing the scrapbook paper designs and colors and deciding which flavor of Joe Tea I wanted to drink so I'd have an empty bottle! Oh, and getting out of Whole Foods without stopping in the Bakery Department and buying some chocolate chip cookies!


**What's EEBCDI? This acronym stands for "Easy Enough Even Bill Can Do It." Bill is my patient husband who tries out a lot of my craft projects to see just how crazy they would make the basic bride who isn't long on craft skills but who wants to put some personal 'touches' into her wedding. Yes, if Bill can do it, I can do it, and you can too!


Monday, June 25, 2012

DIY Pretty Feet For Brides and Bridesmaids from The Dollar Store

Photo and tutorial link at Andrea's Bow Cottage

It's time for another dollar store DIY project. First let me say while previous Dollar Store projects have been EEEBCDI(**Easy Enough Even Bill Can Do It) this is NOT!

Maybe it's just that braiding skills aren't something most men grow up learning how to do or maybe it's just decorating with ribbons, but he had a tough time with this (or at least the final product is NOT one you'd want to wear, although kudos to him for his valiant attempt! Thanks Bill!)

The whole tutorial is on Andrea's Bow Cottage where you'll find still more photos and a complete tutorial so you can make some of these cute flip flops for your bridesmaids (or you can make them together as a group) so everyone has comfortable footwear for dancing. Andrea used flip flops from her local Dollar Store to make these pretty braided flip flops.

Face it, those five inch heels look pretty, but not many of us want our toes squashed for an long, long wedding day! So get a pretty pedicure with some pretty polish and wear these flip flops with flair!


Close up photo and tutorial link at Andrea's Bow Cottage


**EEEBCDI stands for DIY projects that are "Easy Enough Even Bill Can Do It" This lets brides know that even if they are DIY impaired, or if they want to grab their groom and get some help, these projects are good choices. My husband who is NOT craft-oriented has tested any project listed as EEEBCDI so there's no second guessing about how tough the project is. He has lots of great skills but he is NOT into crafts of any kind (unless he gets to play with the electricity or plumbing, for some reason he CAN do that!)

Sunday, June 24, 2012

Wall of Flowers


When 'something blue' takes over your whole wedding, consider these flowers! Or I guess I should say this 'wall of flowers.'

These pots are easy to add to a wall if you are having a backyard picnic wedding and reception. I love having the 'centerpieces' not placed on the tables at all!

Just paint the pots, repot the plants in a coordinating color, and hang them on the wall. By placing them on the wall, it will leave space on the tables for food, drink and favors or individual cameras.

Saturday, June 23, 2012

DIY Dollar Store Centerpiece - Fast and Easy!

DIY project by Martha Stewart, reposted on Afloral

The Dollar Store strikes again! (as does Martha Stewart's creative team!) How great looking are these centerpieces made from vases from The Dollar Store, a single large bloom for each vase, and a votive candle?  Just wire or tie the bloom on the outside of a tall glass vase found at your local Dollar Store (OK this is super easy! Anyone can shop!) Then add a votive candle to the center of the vase. Set it on a square base to protect your table from direct heat from the candle and voila! (Oh and it helps to have either long matches or a long Bic lighter to make lighting those votives fast and easy!)

This is a DIY project that is EEEBCDI!( Easy Enough Even Bill Can Do It). Bill is my husband who tests my DIY projects to see just how easy they REALLY are. He's a man more comfortable with his circular saw than a hot glue gun, flowers and candles, but even he pronounced this craft 'easy' and he really liked the price point! So even if you aren't the 'crafty type' these centerpieces are simple and quick to put together. You'll spend the most time choosing your flowers and getting to the store!

Not only does this make a great centerpiece for your wedding or shower, but if you are having pre- or post-wedding parties at your home, maybe barbecuing in your back yard, these vases act as hurricanes, keeping your candles lit even on the breeziest days!

Friday, June 22, 2012

Nail Art


Nail art can be fun as you walk down the aisle on a serious day of your life! So find ways to add bling to your nails to let him know you're still that wild and crazy girl he fell in love with!

Thursday, June 21, 2012

Tutorial for DIY Paper Flowers For Centerpieces or Bouquets

Lately paper flowers are all over the blogesphere. How hard is it to make these beauties? Here's a simple tutorial via Dozi. (Dozi gives you written directions as well as photos if you are having any trouble with these.) (These were originally credited to Martha Stewart, but I couldn't find it on her site (if anyone can, please email me, I'd love to link it directly.)

My daughter is getting married next Valentine's Day weekend, and the idea of paying for red roses for centerpieces ... you don't even want to hear the price quotes I've gotten. So I thought why not go paper? Dozi's simple display uses a white vase (that lets your flowers make a statement) that is simple but effective.


The first time I tried these I was blown away at how EASY they were to make! I used a little bit of double sided tape toward the end to keep them from unraveling, but they have lasted for weeks now. Way longer than any real flower ever would! And I love the look of them on a simple branch. 

And as my readers know, the true test of how easy a project is? Getting my husband, Bill to test it out. Bill is great with tools but crafts, not so much. I am happy to report that this diy project gets the EEEBCDI (Easy Enough Even Bill Can Do It) Seal of Approval! I may turn him into a crafter yet! (NOT!)

Try it and see what you think. I'll be interested to hear your feedback.

Wednesday, June 20, 2012

Heart Shaped Wine Lollipops


Sprinkle Bakes created these incredible heart shaped lollipops flavored with wine! Yum! Add them to your bar and have your bartender hand them out with glasses of wine and let your guests enjoy! They are dusted with luster to add a little bit of extra glitz (because after all it IS a special day!)


Be sure to read all the tips on the recipe. Some additions were made after the fact to adjust the temps for better results. 

So have fun! Enjoy both the making and the looks on your guests faces when they taste test your creations following Sprinkle Bake's directions!

Centerpieces for Brides on a Budget


Want a simple but personal DIY project for your centerpieces? Or even to use to decorate your place card table? Why not try these unique three sided lit photos?

The photo came from Wedding By Color Soon To Be Kelly and is complete with directions on the site.     Directions for them are there as well.  Be sure to take the time to browse the rest of this interesting site and see what other ideas might work for your wedding.

Choose your favorite photos, whether of you and your fiance as adult or as children or a combination of both.  These inexpensive centerpieces are perfect for the Bride on a Budget!

Monday, June 18, 2012

Keep Your Photos Forever!

Looking for a great way to share your engagement, pre-wedding festivities and wedding photos? Head over to LivingSocial and pick up one of their deals on a Picture Keeper. What IS a picture keeper?

Photo from LivingSocial

A picture keeper is an easy way to store photos so they do not eat up the memory on your computer's hard drive.

Even if you aren't an avid photographer, weddings bring out the picture bug in all of us (and a photo is worth a thousand words, even if it is just of Aunt Esmerelda dancing on the the tabletop at your wedding!) Somehow describing her 'dance' isn't quite the same thing!

This easy-to-use drive thumb drive is the first all-in-one USB device in the world with embedded software to protect pictures and other irreplaceable files.

No software installation is needed. Just insert your Picture Keeper into the USB jack on your computer (Mac or PC) and it will automatically find and save all your pictures! No more lost photos or having to delete photos because they are eating up your memory!

Say goodbye to deleted photos with this deal from Picture Keeper and LivingSocial:

Pay $15 (regularly $30) for the PK 4 that holds up to 4,000 photos,
pay $30 (regularly $60) for the PK 8 that holds up to 8,000 photos,
or pay $40 (regularly $100) for the PK 16 that holds up to 16,000 photos.

This deal is only available for 132 more hours, so scoop it up soon!


DIY Candle Centerpieces


Looking for an easy way to make your own candle centerpieces? Martha Stewart offers brides (and other hostesses) an easy to make summer centerpeice.

Candles make eye-catching centerpieces and these sand and shell centerpieces add ambiance to any occasion. I'd love to use them at a beach wedding reception.

These are easy to make and great for outdoor because they keep the candles from blowing out. I prefer the tone on tone look shown above but you could go with colored sands or candles as well.

Just use candle adhesive to secure the tapers to the bottom of the heat resistant glass vases and pour in some sand around the candles. Then add a few shells  so each centerpiece looks like a piece of the beach.


Friday, June 15, 2012

Terrariums Light Up Your Wedding


Solar Powered Terrarium by East Coast Creative Girls

I admit, I totally fell for the East Coast Creative Girls ( formerly known as  “The Real Housewives of Bucks County”when I saw them on The Nate Berkus Show. I mean they could so be me! (NOT!) Wow are these ladies think outside the box creative geniuses! And Becky on Infarrantly Creative is right up there with them!


Now Known As East Coast Creative

I am feeling... dejected! My DIY skills are soooo lacking comparatively. But just in case you have not had the chance to experience either of blogs, I had to share! And I think I'm going to 'steal' the terrarium idea for my daughter's wedding!


The directions for the Solar Powered Terrarium say it will take under 15 minutes. Well I figure I need to quadruple that due to my fumble thumbs. Even at that it is a super easy project--in fact it's an EEEBCDI project!

For anyone not familiar with my rating system, since I am 'craft skill deficient' but want to encourage brides who want to do something 'crafty' for their weddings, I developed a rating system. EEEBCDI stands for "Easy Enough Even Bill Can Do It." (Bill is my husband, sure give him a computer he's not dangerous, give him some mod podge...)

"EEEBCDI" is the stamp of approval for crafts that ANY bride (or groom) can to no matter what their craft skill level. Better known as my less than crafty husband tested the difficulty quotient of these projects and rates them as easy to manage. And even with his less than crafty skills (I mean LESS crafty than MINE) and no training, he managed to produce a good end result!

So join the very creative ladies of East Coast Creative and Becky on Infarrantly Creative and drool over their great creations. But then go ahead and make this one, because if Bill can do it, and I can do it, you can too! Trust me! It really is East Enough Even Bill Can Do It (EEEBCDI)!


Thursday, June 14, 2012

See Goodwill Old Go To Sparkling Gold, Shoes That Is!


Go from old to gold! Shoes that is! Have an old pair of shoes you want to change the look of? Maybe an old pair of those ugly tinted shoes that you wore as a bridesmaid or even when you went to a formal dance? Or a pair you picked up at Goodwill just to try this DIY project out on? OK, here you go, a visual tutorial from Duitang.

This is a step by step photo tutorial from Duitang, an Asian site that has pictures that truly are worth a thousand words! Try it out, see what you think.  Hey, if it means you can recycle a pair of those old and uglies... even if they don't turn into Jimmy Choos, it sounds like a good deal to me!

Some craft paint, some glue and some glitter! Voila! Inexpensive and a fun way to switch out your shoe looks!


I laughed as I read a couple of the items listed as needed for the making these gold shoes.  Netflix? Adult Beverage? This write obviously had her day planned out!


So grab that glitter and Mod Podge and get No matter which tutorial you choose to use, the adult beverage listed as necessary in the second tutoial might make the project more fun! Invite your bridal party over and you can  all do your shoes at the same time! Have fun!

Best of all, using Mod Podge holds all your glitter in place so you will not be leaving a 'trail of gold' behind  you as you walk down the aisle!


Wednesday, June 13, 2012

Paper Kissing Ball--Hole Punchers Heaven!

Source: duitang.com via Erin on Pinterest

I love this kissing ball, pomander, whatever you'd like to call it! It looks easy to make, although time consuming. Will let you know once I locate the petal punch. Pearl pins should be easy to find! I found this posted on Pinterest. Carry it with a ribbon, perch it on a short candlestick, hang it from a shepherd's crook, whatever your choice this delicate ball will draw ooo's and ah's! I admit I'm not sure what language it's in so I can't translate it for you, but the photos and idea come from Duitang.com.

Take 'Em Out To The Ballgame!


Are you having a bachelor party that starts at your local major league baseball stadium? As a Philadelphia fan I can see these being a HUGE hit with Phillies fans! Want to make some unique do it yourself invitations? Take a look at these bachelor party invitations from Brooklyn Limestone! Interesting no? Whether you use them for a bachelor party or a party for your son or daughter's ball team these are fun to make and fun to receive!


For directions head on over to Brooklyn Limestone. Never visited "Brooklyn" before? You are in for a creative treat! You'll find not just these invitations but a lot of other great diy ideas that are fun to make and fun to use! Just because "Brooklyn" thought these up doesn't mean you can't make them for your favorite local team! Just use your imagination!

Having your wedding at the local stadium? I know some baseball fans do. Why not use the same idea for your wedding invitations? Sure it's more work than just printing out some paper invitations, but don't you want your wedding to be memorable?

Tuesday, June 12, 2012

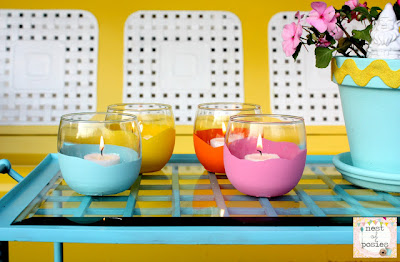
Dollar Store DIY Project--Making Colorful Votives


Kellie from Nest of Posies made these great Dollar Store Dipped Votive Candles and I wanted to share her wonderful work with you. Visit her site to get the exact directions (I promise you, they are NOT hard!) And these dipped Dollar Store votive candles are perfect for tabletops for picnic or backyard wedding receptions, rehearsal dinners and post wedding parties.

Bright colors make tabletops pop no matter how casual or formal your wedding is. Add them to the tops of outdoor wedding tables, but be sure to group them together to get the 'color block' look. 

I admit, I fell in love with this project! Obviously you could make the pot shown yourself as well, some colorful rick rack added to a painted pot, then add some bright colored flowers! Simple!


The hardest part of these do it yourself projects? Choosing the colors! There are so many great paint colors to choose from!

Having an indoor wedding come winter time? Try metallic and jewel tone colors!

So head over to Nest of Posies and get ready for a nice long visit, so many great ideas, so little time! But it's well worth it to take some time to browse through all Kellie's great work!

Monday, June 11, 2012

DIY Nail Art From The Dollar Store


The perfect nail art, it is easy to do all by yourself at home! What do you need? Your favorite shape hole punch (right from the Dollar Store), a base coat, favorite polish, sealer, contrast color for design, and masking tape.

Just punch out a shape or design on masking tape. I told you--SIMPLE! It might take a few tries because of the stickiness of the tape, but keep trying. (My Dollar Store had a heart punch for it's steal of a price, you got it, a dollar!)

Attach the tape with the design cutout to your nail firmly, otherwise your polish will bleed.


Apply your contrast polish. This is when you can get as creative as you like. Add glitter, dots, animal prints anything you can think of! It's easy to do because your manicure is covered by the masking tape so it is impossible to mess this up!


Slowly peel off tape. Very gently. Very slowly, after about a minute of dry time. Soft and slow will keep you from messing up your manicure. Then add you sealant. You can keep using the same piece of masking tape over and over.


Sunday, June 3, 2012

Exfoliate and Be Beautiful!

Sugar Scrub? Salt Scrub? Either one will help you exfoliate and be beautiful on you wedding day. So if you are planning on having glowing skin for your wedding day, or want to make something nice for you bridesmaids for getting ready the morning of your wedding, scrubs are the answer. How about making everyone their own personal shower scrub?

My personal favorite for scrubs is grapefruit, but any citrus peel will have the essential oils that are so good at rejuvenating your skin and making you feel fresh and pretty. (What bride doesn't want to feel that way on her wedding day? Or have her bridesmaids feel the same way?)

Citrus has a two-fold purpose: it's acid loosens the top layer of dead skin cells and the ground up peel help you slough it off. (Oh and did I mention it smells good?)

Try this easy scrub that can be prepared up to a week in advance (perfect for the busy bride to be!):

Greek Goddess Citrus Scrub:

1 T dried citrus peel of your choice, chopped up and ground in your food processor
1/4 C vitamin E oil
1 tsp honey
1/2 C Greek yogurt

Mix all four ingredients together until well blended.
Massage onto damp face (or body, love this on my elbows and heels!).
Use a warm water rinse with a quick after splash of cold water.

If you don't feel like you have the time or want a scrub that will last, visit your local H2O store or Beauty.com.


H2O makes a great scrub from skin smoothing salts for gentle and effective exfoliation for normal or dry rough areas. The added marine extracts of sea lettuce, sea fennel, algae and wakame are blended with natural oils, canola and sunflower to give your skin a polished moisturized glow. Just what every bride wants!

Another scrub recipe that I came across (thanks to the folks at Florida Crystals) is their recipe for Natural Cane Glimmer Sugar Scrub.

1 C Florida Crystals Natural or Organic Sugar
1 C vegetable oil
Oil from 1 Vitamin E capsule
1 or 2 drops of essential oils (lavender or orange)
1 16 oz container with lid

Combine the ingredients until well blended. Than take a spatula and transfer the scrub into the container, securing the lid. Contents will settle. Be sure to mix before using. Scoop about a teaspoon into your hands and massage gently into your skin using a circular motion on wet skin. Leave on 3 or 4 minutes before thoroughly rinsing with warm water. It will tighten our pores and you'll smell great!

Now that you have your beauty regimen planned out (or stirred up and jarred) you're ready for your big day! Ready to glow as you walk down the aisle.


Saturday, June 2, 2012

Do It Yourself Wedding Shoes


One of the hot current trends in weddings is do it yourself wedding shoes. See this real Tennessee wedding photo posted on The Bride's Cafe. The bride, Taylor, said she made these herself! Do you think you could duplicate them? Or can you top this? If you think you've topped them, send a photo to nancycels@aol.com (the editor of WDW) and we'll have our readers vote.

Some brides have painted leather, others have worn creative sneakers or even monogrammed wellies. Some brides stick with simply adding silk flowers to their shoes that coordinate with their wedding bouquet. No matter what the choice, it is nice to see brides taking a hand in being the creative force behind their wedding day.

Friday, June 1, 2012

DIY Wedding Flower Ball Tutorial

Source: google.com via Chrysta on Pinterest

How easy are these DIY wedding flowers? Take some carnations (in any color you choose), a silver candlestick, a Styrofoam ball, (soak the ball in water), and get to work filling the ball with carnations all over!

Pink, white, reds, any color carnation you like. Combine the size and color of the balls to make your wedding look great! Carnations aren't expensive but keep in mind you will need quite a few for each ball.


Even dye the carnations to match your color scheme! Here is the final look in multiple colors, nice huh? Get to work! Time's a wastin'! Not quite EEEBCDI (Easy Enough Even Bill Could Do It) but not too hard either!